Ultimaker Cura: A Comprehensive Guide
Wondering how to use Ultimaker Cura? If you’re new to 3D printing, you’ve probably heard the name Ultimaker. It’s one of the market leaders in consumer 3D printers and, more specifically, 3D printer filament.
The company also produces its own 3D slicing software, Ultimaker Cura, with which you’ll need to prepare your 3D models for printing. This guide will teach you how to use Ultimaker Cura, from downloading and installation all the way through to exploring the software’s tools and features.
To get started, you’ll need to download and install Ultimaker Cura. You can do so directly from the Ultimaker website. Once you’ve done this, you’ll be able to configure it for your specific 3D printer.
Workflow and Interface
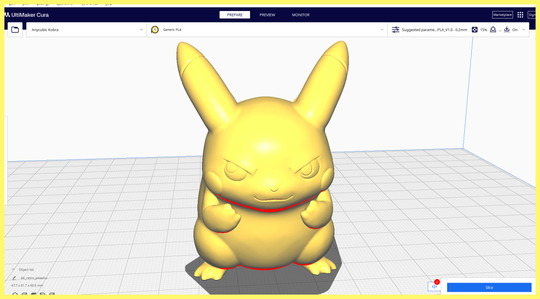
The interface of Ultimaker Cura is intuitive, allowing you to create new projects, open files, and export files. You’ll also find buttons to load and save files, as well as buttons to configure the settings for your selected tool.
You can import your 3D models in various common file formats, such as STL, OBJ, 3MF, DAE, and G-code. Once the model has been loaded, you’ll be able to move, scale, rotate, and mirror it.
If you need to apply specific settings to all of your imported models, you can use the Per Model Settings feature. This allows you to apply settings related to layer height, print speed, temperature, infill density, and support settings.
Before you go ahead and slice your design, you should take some time to adjust the settings. Simply click the triangle next to the Slice button to open the Preview Panel. This will allow you to visualize your sliced model layer by layer (see image below).
You can then go ahead and click the Slice button to begin the slicing process. To save the G-code file for your print, you’ll need to go back to the main interface. Simply click File > Save (see image below), and give your file a name and a location on your computer.
Ultimaker Cura supports the use of plugins or extensions, which can be downloaded from the Marketplace. These can be installed within the software to add new features, such as the ability to generate support structures or generate multi-material prints.
Another type of plugin you might want to install is Ultimaker Cura Material profiles, which are optimized for 3D printers. These can be installed by clicking the + sign next to the Ultimaker Cura icon in the Windows system tray, and then clicking Install material profiles.
To keep your software up to date, you should click the Check for Updates button in the Ultimaker Cura interface. This will allow you to download the latest features and bug fixes.
If you ever need to back up your settings, you can do so through the Cura Backups feature. Simply click File > Settings > Cura Backups to manage your backups.
That’s it, you should now be familiar with the workflow and tools of Ultimaker Cura. This will enable you to optimize your 3D printing process and produce high-quality models.
If you’re looking for more 3D Printing Software to try, we’ve got you covered with our guides to Simplify, PreFlow, and VicoVation – three other popular 3D slicing tools.
