Improving your 3D prints with Z-offset adjustment
If you’re looking to improve your 3D Prints, one of the most important settings to check is the Z-offset. Incorrect Z-offset can lead to print failures or, worse, damage to your bed. So, before you start adjusting and testing your 3D printer’s other settings, make sure it’s properly leveled and Z-offset is set up correctly.
Before we go into how to adjust Z-offset on your specific model, it’s worth noting that performing proper bed leveling is crucial to achieving good results. If your bed isn’t level, your prints will come out with lines of unevenness, and you’ll be unable to adjust the Z-offset correctly. To find out how to level your printer’s bed, check out our handy guide.
How to manually adjust Z-offset
Manually adjusting the Z-offset on your printer is a simple process that involves using the LCD screen and a piece of paper.
Start by homing your printer, which moves it to the home position, located above the center of your build plate. Next, disable your steppers so that they don’t move while you’re making adjustments. Then, lower your nozzle until it’s just above the bed. Finally, place a piece of paper flat on your build plate and use the display screen to slide the paper under the nozzle until it comes to a stop.
The paper you’ve placed on the build plate should now have a slight indent where the nozzle has touched it. Use this as a guide to adjust your Z-offset until the nozzle is just above the bed by the same distance as the indent on your piece of paper.
How to adjust Z-offset in software
While manually adjusting Z-offset is easy, you may want to make adjustments in more detail through the control interface. This can be done by increasing the Z-offset value by 0.01mm increments until the nozzle is just above the bed by the same distance as the indent on your piece of paper.
If you’re using a model that uses G-code files, such as Prusa i3 MkIII G-code files, you can also adjust the Z-offset in your slicer or through the G-code commands in your print software. Increasing or decreasing the Z-offset value will move the zero point or print head up or down, respectively. You’ll need to modify the G-code commands within the file to make these adjustments, which can be tricky to do correctly.
Alternatively, both Repetier Host and Cura offer options to adjust the Z-offset directly within the interface itself.
How to adjust Z-offset during a print
Some printers let you make adjustments to the Z-offset during the print. This is known as “baby stepping” and can be useful if you want to make slight adjustments to your Nozzle-to-Bed Distance as the print progresses.
This is possible through the display screen on many printers, but the easiest way to make baby steps is through the MatterControl software. Simply use the slider on the interface to make adjustments and MatterControl will send the new Z-offset to your printer.
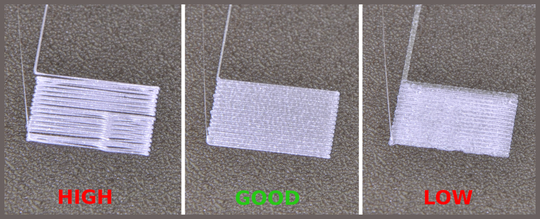
Before you start making baby steps, it’s a good idea to test a couple of test prints to verify that your Z-offset settings are correct. To do this, print a 0.22mm high square and check that the surface is smooth. If your test print still has issues, it’s likely that there are other settings that need adjusting, rather than your Z-offset.
Now you know how to adjust your Z-offset, you’re ready to improve your 3D prints. If you’re planning to build a new printer, check out our best 3D printer guide to make sure you pick the right one. We also have an overview of the best filament to use with your printer, and the best 3D Printing software you can use with your model.
